
How to Make a Miniature Dollhouse: 7 Steps to DIY Mini Dollhouses
Learn the art of making a miniature dollhouse. Transform ordinary materials into a tiny realm of imagination. Each delicate piece holds the potential to transport you to a world where attention to detail reigns supreme. This craft requires precision and creativity to create a unique masterpiece that reflects your style.
Dive into the world of miniatures. There, every decision and brushstroke adds a touch of enchantment to your miniature world. Enjoy discovering the secrets of each step of this craft.
Key Takeaways
-
Use high-quality materials and attention to detail for realistic miniature dollhouses.
-
Personalize with DIY miniature furniture and decorations for a unique touch.
-
Maintain and display dollhouses carefully to preserve their charm and craftsmanship.
-
Draw inspiration from real-life design for crafting lifelike miniature environments.
Materials Needed for Making a Miniature Dollhouse

When gathering materials for creating a miniature dollhouse, focus on standard supplies like wood, cardboard, foam board, and balsa wood. These materials are essential for building the structure of the dollhouse.
Additionally, you’ll need polymer clay to create miniature accessories, glue to assemble the pieces and paint to add color and detail to the dollhouse. These basic materials are perfect for beginners venturing into miniature dollhouse making.
Pay attention to detail and precision when working with cardboard and other materials. This will ensure a realistic and charming final result. Ensure these key materials are on hand before moving on to the next steps.
How to Make a Miniature Dollhouse: 7 Easy Steps

Now, let’s walk through the steps to create your miniature dollhouse.
Step 1: Planning and sketching out the design
Sketch out a detailed plan for your miniature dollhouse design. Consider the layout and room sizes to ensure a proportional and aesthetically pleasing final result.
Determine the scale of the dollhouse, like 1:12 or 1:24, to match furniture and accessories accurately.
Research materials such as wood, glue, paint, and miniature furniture to bring your project to life.
For a realistic touch, be mindful of details like wallpaper, flooring, and lighting fixtures.
Measure precisely and follow your plan closely during construction to ensure accuracy. This step sets the foundation for your mini-doll masterpiece.
Don’t forget to consult any kit’s privacy policy. Then, you can enjoy the creative process of designing your miniature dream house.
Step 2: Building the frame
Construct the frame of your miniature dollhouse using lightweight materials. You can use balsa wood or foam core board for easy handling and customization. Measure and cut the wood pieces precisely to create the structure of your dollhouse. Use wood glue for secure bonding, ensuring stability.
Building the frame sets the foundation for the dollhouse’s structure. Consider adding walls, floors, and ceilings to establish the basic layout of your miniature living space. Include removable panels or sections for convenient interior decoration and furniture placement.
Step 3: Adding walls and roofs
When adding walls and roofs, ensure a secure attachment for stability. You can also consider incorporating decorative trim for added detail. Secure the walls using glue or nails to provide stability to the structure.
Attach the roof panels using an appropriate adhesive. This ensures proper alignment and fit for a polished look. Add decorative trim or shingles to the roof to enhance the aesthetic appeal.
Remember to allow enough drying time before proceeding with further assembly or decorating. By focusing on these details, you can create a charming and stable miniature dollhouse. It will be a delightful addition to your collection.
Step 4: Making miniature furniture
As you progress in creating your miniature dollhouse, the next crucial step involves crafting personalized miniature furniture. These small pieces will enhance the authenticity and charm of your miniature setting.
Using materials like clay, you can create small and simple furniture pieces such as chairs, tables, and accessories to fit the scale of your dollhouse. Clay is a versatile material that allows you to mold and shape intricate details. It can make your furniture pieces unique. Consider painting or staining the clay furniture to add character and realism.
Step 5: Decorating the interior

Decorating the interior of a miniature dollhouse can be a fun and creative project. Decide on a theme for your dollhouse, such as a specific period, style, or color scheme. This will help guide your decorating choices.
Experiment with different furniture arrangements to best use the space in each room.
Incorporate small decorative items such as rugs, artwork, plants, and other accessories. They can bring the rooms to life.
Add personal touches to make the dollhouse feel unique to you, such as family photos, handmade items, or other custom decorations.
Remember, the key is to have fun and let your creativity shine.
Step 6: Adding details like curtains and rugs
To enhance the realism and charm of your DIY miniature dollhouse, consider adding details like curtains and rugs. They can bring each room to life. Curtains can be crafted from fabric scraps or lace, adding a realistic touch to the windows.
For rugs, you can use felt or miniature carpet samples to enhance the flooring of different rooms. Add curtain rods made from thin wire or toothpicks. They can help hang the miniature curtains elegantly.
To personalize the rugs, decorate them with patterns or textures with fabric paint or markers. Creating matching curtains and rugs can establish a cohesive design theme throughout the various rooms of your kit miniature dollhouse, elevating its overall appeal.
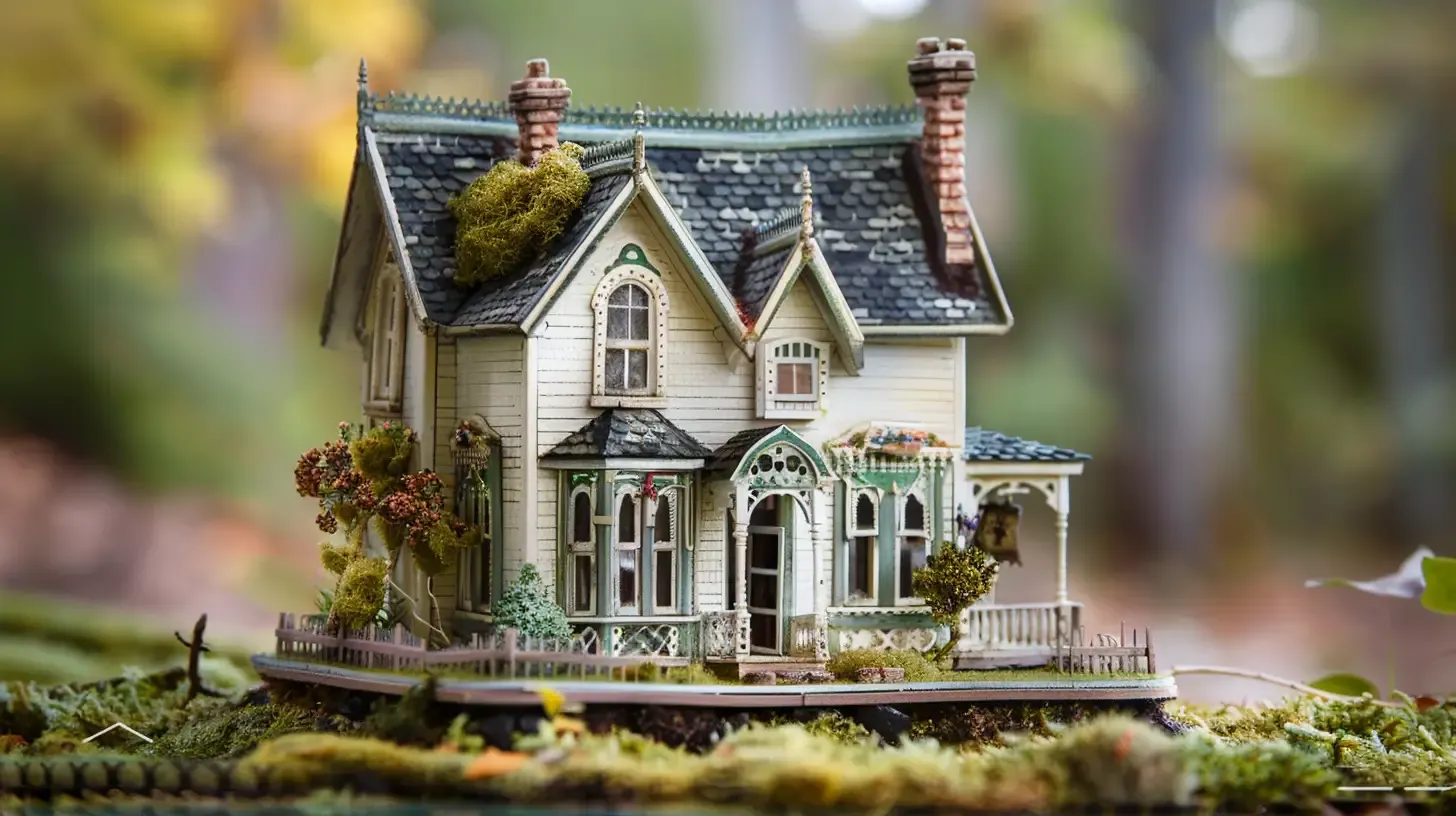
Step 7: Painting and decorating the exterior

For an extra touch of realism and personalization, paint and decorate the exterior of your miniature dollhouse. Create a vibrant finish by applying multiple coats of paint to the walls and roof.
To enhance the charm of your dollhouse, add details like window frames, shutters, and contrasting door accents. Use small brushes or sponges for precision when painting intricate features. Allow each layer of paint to dry completely before adding more coats or details.
When building and painting a miniature dollhouse, attention to small details can bring it to life.
Tips and Tricks for Making a Realistic Miniature Dollhouse

Invest in high-quality materials like wood, metal, and fabrics for a truly realistic miniature dollhouse. They can enhance the authenticity of your creation.
Start by making miniature everyday items like books, plants, and dishes to populate your dollhouse realistically. Pay attention to scale, proportions, and color schemes to create a lifelike environment.
Incorporate miniature lighting fixtures and tiny decorations for added depth and ambiance. Experiment with DIY techniques such as crafting miniature furniture, tiny food items, and landscaping to personalize your dollhouse.
Draw inspiration from real-life architecture and interior design to achieve authenticity in your miniature dollhouse. By focusing on details and using quality materials, you can bring your miniature dollhouse to life.
Maintenance and Display of a Miniature Dollhouse

Regularly dust your miniature dollhouse with a soft brush or compressed air to maintain cleanliness and prevent buildup.
Store your dollhouse in a dust-free display case or cover when not in use. Doing so protects it from environmental elements.
Use mild soap and water to clean miniature furniture and decor items gently. Remember to avoid harsh chemicals.
Rotate miniature accessories periodically. This prevents sun damage and ensures even wear and tear.
Consider investing in a specialized miniature dollhouse maintenance kit for comprehensive care and upkeep.
Conclusion
Now that you’ve completed your miniature dollhouse, step back and admire your handiwork. Your attention to detail and creativity have transformed simple materials into a charming miniature world.
Remember to showcase your masterpiece proudly and enjoy the magic it brings to your space. Keep exploring new techniques and ideas to continue adding to the enchantment of your miniature creation.
Congratulations on a job well done!
FAQs
Q: How long does it take to build a miniature dollhouse?
A: Building a miniature dollhouse can vary in time. Simple kits can be done in hours, while complex ones take weeks. Experienced builders can finish in a weekend, but beginners might need longer. It all depends on the project’s scope.
Q: What are dollhouse miniatures made of?
A: Dollhouse miniatures are commonly made of wood, metal, and plastic materials. These materials are used to create furniture, decor, and accessories. Their choice impacts realism and quality. Collectors treasure high-quality materials for authenticity and durability.
Q: How do you make a mini dollhouse out of cardboard?
A: To make a mini dollhouse out of cardboard, start by cutting pieces for walls, floors, and roofs. Securely assemble with hot glue, add windows and doors, and then paint with acrylics. Finish by furnishing with mini-furniture.
Q: How much does it cost to build a dollhouse?
A: Building a dollhouse can cost $50 for a basic kit or over $500 for intricate models. Factors like size and materials impact costs. Custom or artisan-crafted dollhouses can exceed $1000. Furniture and decor add to expenses.